
Create Templates for Incidents, Changes, or Releases
Learn how to create templates and how to use them to create incidents, changes or releases.
Templates are custom, standardized forms that technicians on the account can use to generate new incidents, changes, and releases. The settings can be pre-populated with default values (e.g., title, priority, type, symptom), as well as custom fields and pre-set task lists. Templates can be helpful for organizations that have a set of processes and procedures to follow when submitting incidents and tracking change or release deployment (e.g., a service administrator may want to set up a "Major Incident", "New Employee Hire" or "New Phone Request" incident template that has a pre-defined list of tasks that need to be carried out in a specific order, or a product manager may want to set up a "New Release Version" release template to ensure that all items needed are included in the form).
Create a template
- To make a new incident template, select your desired service, then go to Incident > Templates > New Template.
- To make a new release template, select your desired service, then go to Releases > Templates > New Template.

2. Enter a title and description on the Create New Template page that will help agents identify which template they need and under which circumstances they should use it. Then click Save.

3. Once the new template has been saved (in draft mode, by default), additional tabs appear that allow administrators to add more information. Administrators can click Edit Details on the Description tab to edit the title and/or description, or the Template tab to see the full incident form.

4. On the Template tab, administrators can choose to pre-populate any item on the form. For example, they might want to put instructions about what information is needed for each text box, choose an assignee that all new incidents created from the template should automatically be assigned to, or create a set task list that needs to be completed for each incident (see "Tasks within Templates" below for more information).

5. When service administrators create a task list within a template, they have the following additional options:
- Sequential – Selecting this option creates a fixed order for the tasks, which means that when a new incident is created from the template, the order of the tasks cannot be changed.
- Task Assignee Options – You can choose to make a task assigned to any "user", "current user", "group", or "incident assignee" which allows the new incidents created from the template to be assigned to the person creating the incident (rather than having all incidents assigned to a specific person).

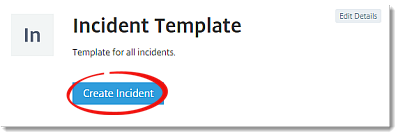
6. Once all changes are made, administrators can return to the Description tab, select Published and click Save to make the template visible to all agents of the service. The following items appear once it is published:
- Create Incident button – Administrators and agents can click this to generate new incidents from the template.
- Incidents tab – All incidents that are generated from a template are listed on this tab.

Use templates to create incidents, changes, or releases
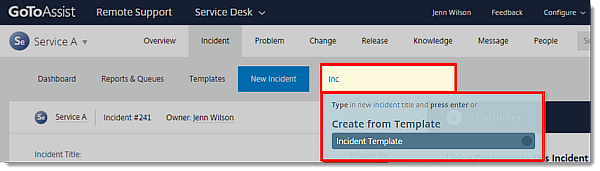
Only service administrators can create and publish templates, but all agents on the account can access published templates and use them to generate new incidents, changes, or releases. To create new incidents, changes, or releases from a template, agents can do either of the following:
- Go to OR go to .
- Use the text field in the top navigation to start typing the template's name, then select it from the drop-down list.

Related
Use Services and Service Management
Create, Configure and Manage Services
Enable and Integrate a Service's Support Email Address
Set Priorities and SLAs (Incidents)
Set Priority Levels (Problems, Changes and Releases)
Set Default Field Selections for New Incidents