Use the Customer Portal
Learn to use the Customer Portal: start with a Quick Start Guide, then learn more on how to submit issues, requests, track submissions, view messages from agents and more.
Each Service Desk account includes a separate Customer Portal, an easy-to-use website that provides your customers with a simple, easy-to-use interface where they can communicate with you and your technicians. Customers can log in to the Customer Portal submit issues or suggestions, browse technician-written knowledge articles and even request live support from technicians on your account (features vary depending on permissions granted by administrators). Administrators can choose which services customers will be able to perform those actions for, and which services they are restricted from.
See Configure Customer Portal Settings for more information about customizing the branding, default settings, security setting and URL of the Customer Portal. See Configure Customer Portal Access Permissions for information about specifying who can access the Customer Portal and how.
Topics in this article:
- Customer Portal Quick Start Guide
- Submit issues, requests, questions and suggestions
- Track submissions and add comments
- Browse the Knowledge Base
- View messages from agents
- Set up Slack integration
- Access the account-wide API token
- Enable Labs features for all users
Customer Portal Quick Start Guide
Before customers can use the Customer Portal, they must first be registered for an account. This can be done by technicians by creating new customers in the account, or it can be done by customers themselves when administrators enable self registration for the Customer Portal.
Once they log in, the Customer Portal allows customers to do the following (note that some features may not be enabled for all Customer Portals):
- Create a new incident in order to report an issue, make a request, ask a question or make a suggestion.
- Track the incidents that they have submitted to see when they're addressed.
- Browse support articles in the knowledge base.
- View messages (i.e., announcements) from agents.
To log in to the Customer Portal, use the Portal URL provided by the agent (i.e., "https://my-customer-portal.assist.com/portal").

Submit issues, requests, questions and suggestions
Customers can use the Customer Portal to communicate with their agents.
From the New Incident page, they can report issues, make requests, ask questions and make suggestions (as enabled by administrators). They can then use the My Incidents page to track the submission through its resolution and stay in touch with their agent.
Administrators must have this feature enabled in order for customers to use this process.
- Click Save when finished. The incident will be available to view and track under My Incidents.

Track submissions and add comments
You can view all of the incidents that you submit in the Customer Portal, which allows you to track their progress, add comments and even view comments from your support agents.
Customers can view all of the incidents that they submit in the Customer Portal, which allows them to track their progress and even add comments.
- Click My Incidents in the top navigation to view the My Incidents page.
- Use the "Only assigned to me," "Open" and "Closed" check boxes at the top to filter the incidents.
- Use the "Order by" drop-down menu above the due date to sort the incidents.
- Change the view by clicking the
 icons.

- If desired, click Add a Comment to send a message about the incident to the agent, then click Save when finished.

Browse the Knowledge Base
If agents publish articles to the Customer Portal, customers can browse and view those articles.
Administrators must have this feature enabled in order for customers to use this process.
- Use the search box to find articles about a particular issue, or just click an article to open it.

- On the article page, the following options are available (as enabled by administrators):
- Rate the article – Rate the usefulness of the article using the Me too or I still need help with this links.
- Get notifications – Click Watchlist to get email notifications if changes are made to this knowledge article in the future.
- Leave comments – Enter text in the Add a Comment field and click Save to add a comment (if enabled by the agent on a per-article basis).

View messages from agents
If agents publish messages to the Customer Portal, you can view them by clicking Messages in the top navigation.
- Click Messages in the top navigation.

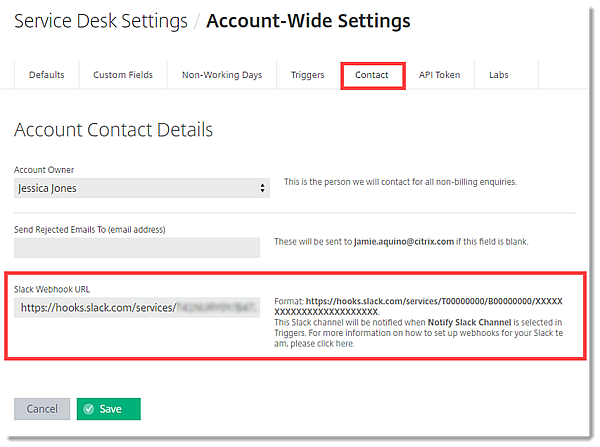
Set up Slack integration
If you use Slack as your chat client, you can set up an integration with Slack that allows you to create trigger(s) within Service Desk to notify your Slack channel when conditions of your trigger(s) are met.
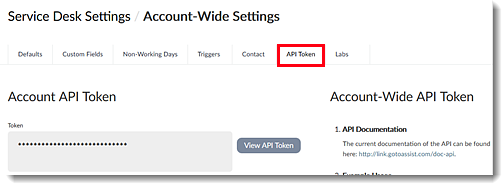
Access the account-wide API token
To display your account's API token, click View API Token.
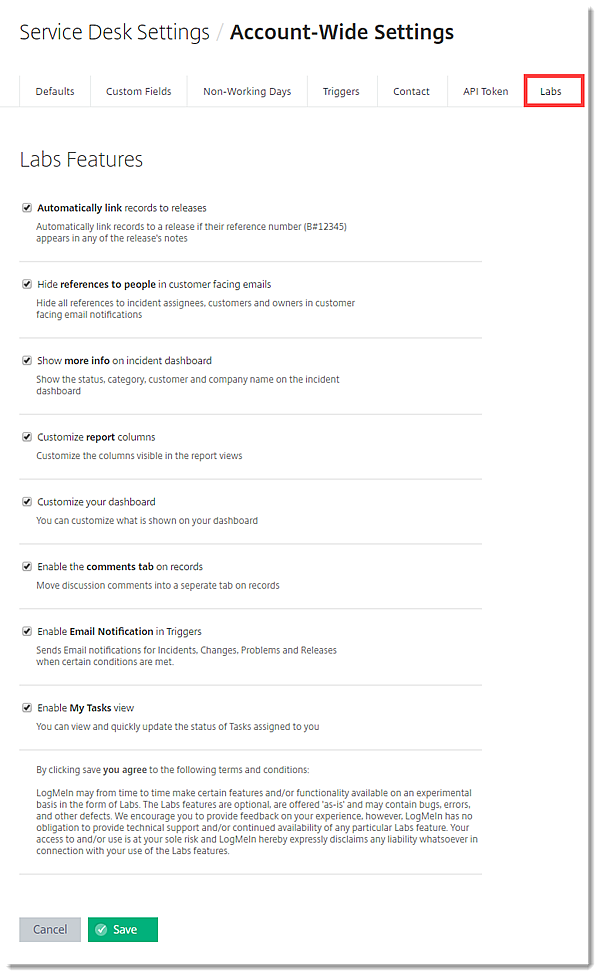
Enable Labs features for all users
Service Desk offers a few beta features (known as "labs" features) that account administrators can turn on and off for the entire account, which enables users to try out new and in-development features in their "as is" state. In addition, the page allows account administrators to opt-in to potential upcoming features, which allows the Service Desk development team to gauge interest in possible new features before devoting time to their development (e.g., customizable report columns, discussions hosted on a separate comments tab, etc.).
See Enable Beta Features (Labs) for more information about the available labs features.