Configure Customer Portal Settings
Learn how to configure the look, feel and settings for the Customer Portal.
Each Service Desk account includes a separate Customer Portal, an easy-to-use website that provides your customers with a simple, easy-to-use interface where they can communicate with you and your technicians. Customers can log in to the Customer Portal submit issues or suggestions, browse technician-written knowledge articles and even request live support from technicians on your account (features vary depending on permissions granted by administrators). Administrators can choose which services customers will be able to perform those actions for, and which services they are restricted from.
See Configure Customer Portal Access Permissions for more information about setting up the Customer Portal.
Before customers can use the Customer Portal, they must first be registered for an account. This can be done by technicians by creating new customers in the account, or it can be done by customers themselves when administrators enable self registration for the Customer Portal.
Modify customers' ability to report issues, make requests, ask questions and make suggestions
Administrators can control if and how customers are able to submit feedback to agents through the customer portal (on a per-service basis). For example, they could provide only the "Report an issue" and "Make a request" options, or they could remove all options completely to prevent customers from submitting any feedback. See Set Types for more information.
- Go to .
- The top 4 incident types are designated as "Issue," "Suggestion," "Question" and "Request." You can keep the default priority names, or modify them and add subtypes as desired. Click Add Another to add additional types.
Note: Subtypes can be particularly useful for customer-facing incident types. Allowing your customers to choose subtypes helps you respond to them better and faster.
- Use the "Allow in Portal" check boxes to select which of the incident types should be available within the Customer Portal when a customer is submitting an incident. When any of these types is visible in the portal, then customers can select the corresponding link ("Report an Issue," "Make a Request," Ask a Question," or"Make a Suggestion") to submit an incident in the portal and have it automatically assigned to the corresponding type within Service Desk.
Note: At least one incident type check box needs to be ticked.
- Click Save when finished.

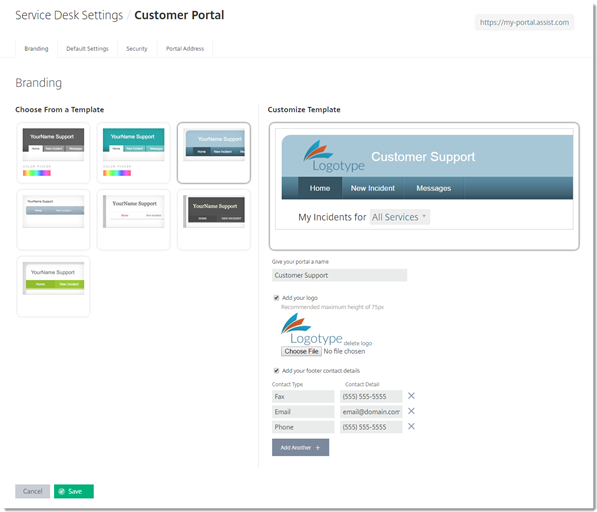
Change the appearance of the Customer Portal
This feature is available to account administrators only.
The look, feel and layout of the Customer Portal can be modified using the Branding tab.
- Go to .
- Choose a template for the layout of the Customer Portal.
- Customize the template by giving your portal a name and adding your logo and footer contact details.
- Click Save when finished.
Change the default Home page and language setting
The default home page and language for the Customer Portal can be modified using the Default Settings tab.
This feature is available to account administrators only.
- Go to .
- Select a default Customer Portal Home Page to the be first page customers see when they log in to the Customer Portal.
- Select a default language for the Customer Portal.
- Click Save when finished.

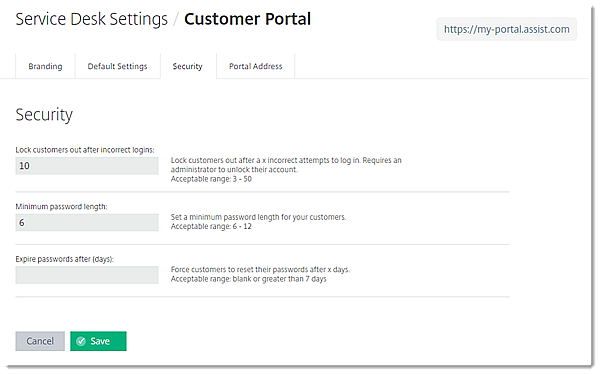
Change the lockout and password settings
The password settings for the Customer Portal can be modified using the Security tab.
This feature is available to account administrators only.
- Go to .
- Lock customers out after incorrect logins – Choose the number of times a customer can attempt an incorrect login before they are locked out of their account and will require an administrator's assistance to unlock it (3 to 50 attempts).
- Minimum password length – Set a minimum password length for new accounts (6 to 12 characters).
- Expire passwords after (days) – Force customers to reset their passwords after a certain number of days (blank or >7 days).
- Click Save when finished.
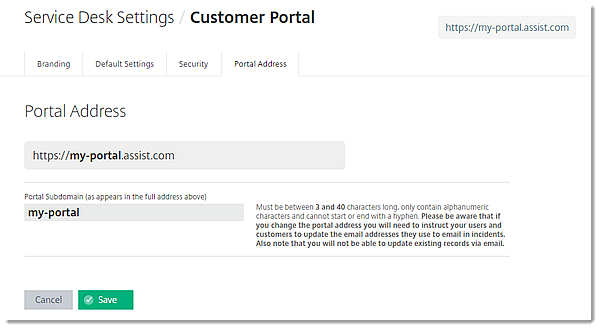
Change the URL of the Customer Portal
This feature is available to account administrators only.
Account administrators can now change the portal subdomain for the URL of the Customer Portal using the Portal Address tab. Administrators should use caution when changing this, however, and keep in mind that this will directly affect all users of the Customer Portal (including affecting their browser bookmarks, etc.) and they should be notified as such.
Administrators can go to , then modify the portal subdomain and click Save to change the URL.