RemotelyAnywhere Getting Started Guide
RemotelyAnywhere is a remote administration tool that lets you control and administer Microsoft® Windows®-based computers over a local area network or the Internet. Originally designed for network administrators by network administrators, RemotelyAnywhere has since evolved to offer a wide variety of remote computing solutions for an equally wide variety of users. Today, RemotelyAnywhere provides such useful capabilities as Java-based desktop remote control, file transfer protocol (FTP) for downloading and uploading of files, configuration of the host computer, remote-to-local printing, advanced scripting, and dozens of other features fully detailed in the rest of this article.
RemotelyAnywhere acts as the host software on the machine that is to be controlled or accessed. The client (the remote computer that is used to access the host) requires no special software. The client software is any Java- or ActiveX-enabled web browser, such as Internet Explorer (IE). Many RemotelyAnywhere features can also be accessed and controlled using such client software as that found in handheld PDAs.
Installing RemotelyAnywhere
Default Installation
- If you have not already downloaded RemotelyAnywhere, locate, download and run the remotelyanywhere.msi, found in http://www.RemotelyAnywhere.com/downloads.htm.
- On the Welcome screen, select Next.
- On the License Agreement screen, select I Agree if you agree to the terms and conditions. If you do not accept these terms, you can exit the setup by clicking the Cancel button.
- The Software Options screen appears next. If the default listening port is acceptable, click Next. For more information regarding customizing RemotelyAnywhere during installation, see Custom Installation below.
- The setup will then ask for confirmation of the destination location for the files for RemotelyAnywhere.
- If you wish to change the destination folder, select the Browse option. Select Next to confirm the destination folder.
- To start copying the files to their destination folder (selected in step 6 above) click Next.
- Select Finish to complete the Setup.
Custom Installation
- Follow steps 1 – 4 of the Default Installation above.
- The Software Options screen allows the user to specify the listening port for use by RemotelyAnywhere.
- If the default port used by RemotelyAnywhere (2000) conflicts with an existing application or service, the user may change it here. If the person installing RemotelyAnywhere is not the Network Administrator, the Network Administrator should be consulted before a port is assigned.
- This screen also allows the user to copy configuration settings from an existing RemotelyAnywhere installation.
- After all options have been configured satisfactorily, select Next.
- Continue with steps 6 to 8 outlined above in Default Installation.
Software Activation
Once you have installed RemotelyAnywhere following the instructions above you will need to activate it. If you have already purchased a license, you will be able to paste it into the space provided and activate the software straightaway.
If you have not purchased a license but would like to do so, you will be given the option to do this on the software activation screen. If you purchase online, your license will be delivered immediately, so you can activate your software without delay. Alternatively, you may want to contact our sales department at sales@remotelyanywhere.com or by calling +1 888 246 5422 (toll free U.S.), +44 871 733 3166 (UK) or +36 1 413 3780 (international).
If you prefer to try the software before purchasing, you are entitled to a 30-day evaluation period. Just select “I would like a free trial” on the software activation screen and follow the instructions. You will need to be connected to the Internet to activate your free trial.
The RemotelyAnywhere free trial uses an identifier value from your machine to control the number of evaluation licenses a single computer can receive. It is generated by passing unique data related to your computer through a oneway cryptographic hash function. The ID generated with this algorithm does not identify you or any component of your computer system: Think of this as a unique ticket that your machine receives.
Accessing RemotelyAnywhere
When the installation is complete, the default Internet browser will open with the address of http://MachineName:2000.
To access the host machine from a different machine, open an Internet browser and enter http://111.111.11.1:2000 on the Location/Address line. The “111.111.11.1” represents the IP address of the host machine. The “2000” represents the default port shown on the Software Options screen during installation. If you changed this port during installation, then use the specified port when accessing RemotelyAnywhere. On the same network the machine name can also be used.
On the host itself you can also access a machine by entering the loopback address http://127.0.0.1:2000 at the Location/Address line. This address allows the user to communicate with the RemotelyAnywhere installation only at the machine on which it is installed.
About Dynamic IP Addresses
Many DSL and cable Internet connections assign your machine a new IP address each time you connect to the Internet. This is known as a Dynamic IP address. RemotelyAnywhere will work if you have a dynamic IP (DNS) address, but RemotelyAnywhere needs to be able to track your IP address so that if it changes, the connection can be maintained. There are dynamic DNS solutions available, often for free, which means that your machine can be assigned a fully qualified and static domain name regardless of your IP address.
Alternatively, Under you can configure RemotelyAnywhere to send you an email message pointing to the IP address of your remote host every time it detects a change. This way, you always know where to find your remote computer.
Logging In

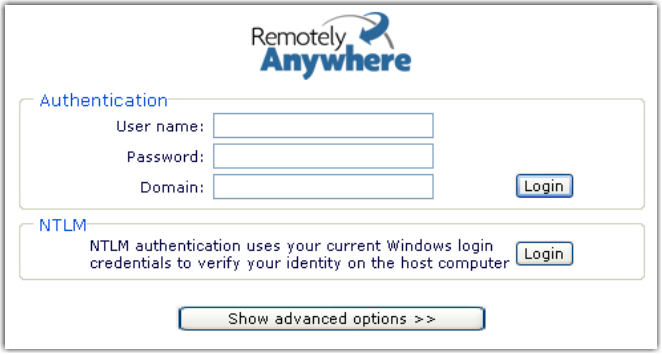
RemotelyAnywhere will access the user database to authenticate the user. Initially, you will need to log on as someone who is a member of the Administrators group. You can later change this default behavior by granting NT users or groups access to RemotelyAnywhere under .
Win98 and ME users need to specify their user name during installation. If they do not, the default user name will be the machine name, and the password field will be blank.
NTLM: By clicking on the NTLM button you can use your current Windows login credentials to verify your identity on the host computer. This only works when accessing a Windows NT/2000 or XP computer. It will use your current credentials (those you entered at the NT logon prompt on the computer running your browser) to identify you to the remote computer. This is only available on local networks.
RSA Support: RemotelyAnywhere now supports RSA security. RSA SecurID offers an extra physical layer of security by demanding conclusive proof of a user’s identity. If your remote machine has RSA installed, the option to use this powerful authentication method will be available on the login screen. For more information please see http://www.rsasecurity.com/products/securid/index.html.
Advanced Login Options

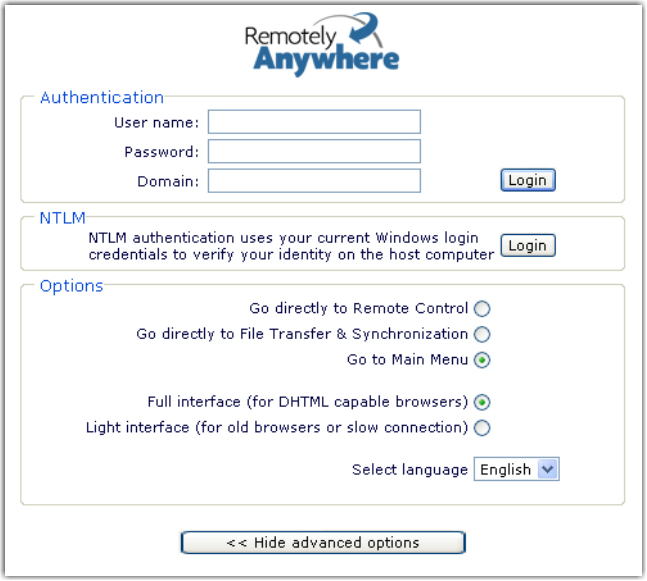
Go directly to: Using these buttons you can select whether you want to go directly into Remote Control, to File Transfer & Synchronization or to the Main Menu page - this last option being the default.
Full and Light Interfaces: You can choose between the full and light interfaces. RemotelyAnywhere’s full interface is for DHTML capable browsers. The light interface is more suitable for old browsers or users with slow connections.
SSL: If you set up SSL Support for RemotelyAnywhere all traffic between the host and the remote computer will be encrypted using industry-strength 128-bit ciphers, protecting your passwords and data. You can do this easily by going to Security, clicking on SSL Setup, and following the step-by-step instructions there. More information about this can be found in this manual’s Section Guide.
Language Option: You are able to select the language of your choice when logging in.
Bypassing the Login Screen
- Remote Control: http://your.machine.here:2000/ntlm/remctrl.html
- Command Prompt: http://your.machine.here:2000/ntlm/telnet.html
- Chat: http://your.machine.here:2000/ntlm/chat.html
- Remote Control: http://your.machine.here:2000/login:yourloginname:yourpassword/remctrl.html
- Command Prompt: http://your.machine.here:2000/login:yourloginname:yourpassword/telnet.html
- Chat: http://your.machine.here:2000/login:yourloginname:yourpassword/chat.html
Accessing RemotelyAnywhere through a Firewall or Router
- Router: External IP address: 111.111.111.111
- RemotelyAnywhere computer: IP address: 192.168.0.10, Port: 2000 (port 2000 is the default but this can also be changed)
Step 1: Mapping a Firewall Port to the Computer
In this case, you would pick a port on the router (say, 5200) and map it to 192.168.0.10:2000. The procedure for mapping ports from routers to computers is router-specific. Usually your router will have a webbased interface that allows you to configure and maintain it. Sometimes router companies refer to this action as Port Forwarding or Port Mapping.
Step 2: Accessing RemotelyAnywhere through a Firewall
Having done the above, you will now be able to fully access the RemotelyAnywhere computer with the URL http://111.111.111.111:5200 - that is the firewall’s external IP, followed by the port you mapped to the RemotelyAnywhere machine.
External Resources for Help with Router and Firewall Configuration
No two router models are exactly alike, and this document lacks sufficient space or scope to offer detailed support for all routers and firewalls and RemotelyAnywhere. However, the overarching principles for port forwarding remain the same. Should your router or firewall documentation prove confusing or insufficient, there are several resources available on the Internet that provide exhaustive instruction and help with configuring routers and firewalls.
